
* Gregor's Room Final Solution

3D Project:  Create a 5 piece bedroom representation with only using paper, water and ink.


Inspired by Kafka's Metamorphosis. 


After reading the story my response was this piece.  The main character Gregor is a traveling salesman who's life revolves around working long, hard days to support his family. He feels trapped in the monotony of his life, constantly working. The fear of stepping out of line creates a panic within him. After Gregor changes into the bug, with a million little legs, he feels trapped within his room. A different sort of panic has set in. 

The bed was seen as an enormous piece that Gregor had to overcome in his new life. As he learned to control the different parts of his body, he lost more of himself and his old world. The rug was plush, soft enough to fall onto and not get hurt. The headboard was ornate and the rich royal blue and green are signs that the family was trying to live in a fashion that was above their means. Thus adding to the stress Gregor felt. 

Little by little the hatred Gregor felt directed at him, while a bug, degraded him to the point of his demise. His old life shattered is represented by the building and a brief case. A grey shadow of his former life hanging over him. As Gregor dwindled into nothing, his family began to thrive. The metamorphosis of Gregor and his family are related. As Gregor dies, his family finally learns to thrive on their own. 


In Process - Painting the pillow

In Process - Bed and Frame
Detail #1 Blanket with Woven detail


Photo #1 Final piece - showing the bed box spring, table, and rug.
Dimensions of bed 9 in x 4 in by 1.5 in
Material is white copy paper, no glue or fixative used.

Photo #2 Final Piece - showing bed, Gregor, Rug


Detail #2 - Up Close bed

Detail #3 - Building and brief case

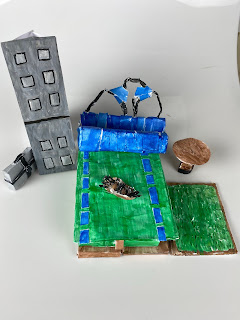
Photo #3 Complete Piece - Gregor's room
"Lost and Found"

Detail #4 - Up Close Table and Brief Case

Detail #5 - Intricacy of Rug

Photo #4 Complete Gregor's Room


Comments

Popular posts from this blog

Intertwined - Grief and Hope

  2D Project - create an image using 2 objects in various sizes to simulate foreground and background fading out of view.  For this project I used two Willow Tree sculptures created by artist Susan Lordi to compose my project. As a military widow these two sculptures hold significant meaning. The foreground is composed of more Hero statues as it signifies more of the immediate grief after suffering loss. As you move toward the middle there is hope and grief mixed together. The background contains more hope then grief as you begin to find yourself again and move forward in your journey. Willow Tree Sculptures Hero and Soar Hero sculpture shadowed from various angles

Project 2 String Art

  Project 2 - String Art String Art dates back to the 1900's, it is art created by making designs with nails and colorful string. Mary Everest Boole is the first person to be given credit for making curves from straight lines contained within her art, which she used to explain math to her students. String Art later became the basis of the Bezier Curve. (String of The Art) Then John Eichinger was the first artist in the US to create what he called 'string mandalas' after the Hindu art form of circles within circles. (String Art Fun) For this project, I adapted this concept of mandalas that I previously used in Project 1, which was a mandala like wood sculpture but with a square base. For these designs I used frames that were found in the wood shop, small nails, and colorful string.  The basis for the designs were to show that even though a structure is created from a square, it can be turned into something else. My patterns were derived from squares but through the work of a...

Sculpture Assignment 1

For this project the criteria was to use an eight foot 2x2 piece of wood to create a formalist sculpture.  When creating this piece I wanted to a work of art that had a topsy turvy aesthetic. The bottom 2x2 is resting on a hard edge, while the other pieces connect off each side.  I cut and sanded out divots into the corner edges all along the interior angles of the wood. Each piece was sanded down to remove blemishes and to create a relatively smooth surface. To fasten the pieces together I used a countersink drill to make the initial holes and then drilled in two screws for each piece, creating stability. Once completely together, the divots were painted white and the remainder was painted black with acrylic paint. After drying, I made a design decision to scratch off the black layer to reveal the white underneath. Reminiscent of old country style, which goes against the more modern look of the overall piece.  If you look closely, one of the side pieces is attached diffe...